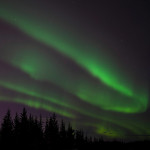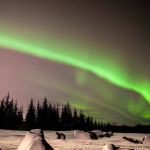

During a recent trip to Iceland I was lucky enough to see the Northern Lights and capture them on camera, I went Aurora chasing with Iceland Travel on a super jeep tour. January to March is a great time to go hunting for the Aurora Borealis due to the long dark nights. In Iceland the sun sets at around 4pm during the winter months and doesn’t rise until 11am so there is plenty of time for stargazing. The sky also needs to be mostly clear to get a good view of the lights. If you are planning a trip to Iceland around the Northern Lights the Icelandic Met Office is a great website for checking on cloud cover up to six days in advance. Of course these forecasts can often change so you may not have a perfect prediction until a few hours before you go hunting.
Hoping to capture the Northern Lights on camera? Look no further here are my top tips…
Things you need:
Camera: Ideally a DSLR or a camera that you can control the settings on manually, I initially tried to take photos using my iPhone and had no luck whatsoever!
Tripod: As all the images will be long exposures you need to ensure the camera doesn’t move during the exposure.
Shutter release: To minimise camera shake, alternatively set the camera timer to 2 seconds.
Setting up your shot:
-
Mount the camera on the tripod and make sure it is level, most tripods have a spirit level.
-
Have the lens set to the widest it will go and compose the image.
-
Set the lens to the widest aperture, in my case 2.8. This allows for the maximum amount of light to hit the camera sensor during the exposure.
-
Set your lens to manual focus and turn the focus ring around to infinity, this will ensure everything is in focus.
-
Set your ISO to around 500 to start with.
-
Shutter speeds that worked for me ranged from 10 – 30 seconds.
-
Before taking the image to minimise camera shake use your shutter release, as mentioned above or set the camera timer to 2 seconds.
Good luck and happy Aurora hunting…